Documentation
How to Use SafeOutside
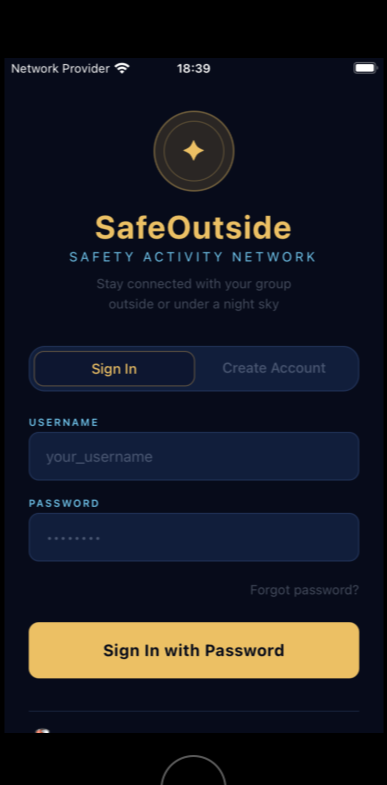
This guide walks you through everything you need to know to get started and stay safe. Before you begin, please read our Disclaimer — SafeOutside is a safety communication aide, not a replacement for emergency services or for direct personal contact.
Contents
1. Getting Started
Prefer a bigger screen? SafeOutside also has a full web app at app.safeoutside.co.uk — sign in with the same account to manage networks, plan sessions and check in from any browser.
↑ Back to top2. Creating or Joining a Network
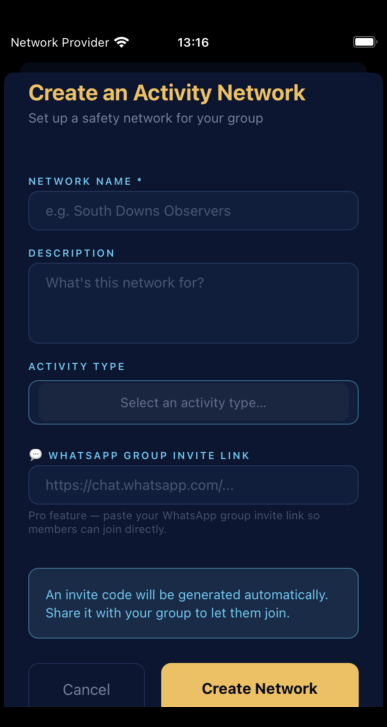
A network is your group — the people who will monitor your safety and whose safety you will monitor in return. This might be your club, your family, or a group of friends.
Create a network
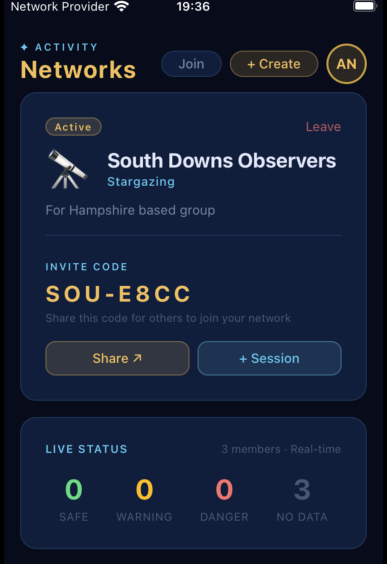
Invite members
Tap Share Invite on your network card to send the invite link. Recipients can open it in a browser, sign in or register, and join automatically. Alternatively, share the short invite code and they can enter it manually in the app.
Join an existing network
Free accounts can create only one network that they own but can belong to multiple networks. Pro accounts can create more than one network that they own and can manage. Upgrade to Pro or Lifetime for unlimited networks.
When someone joins or leaves a network, the owner receives an email notification, and the member gets a confirmation — so everyone stays informed about who is in the group.
↑ Back to top3. Planning a Session
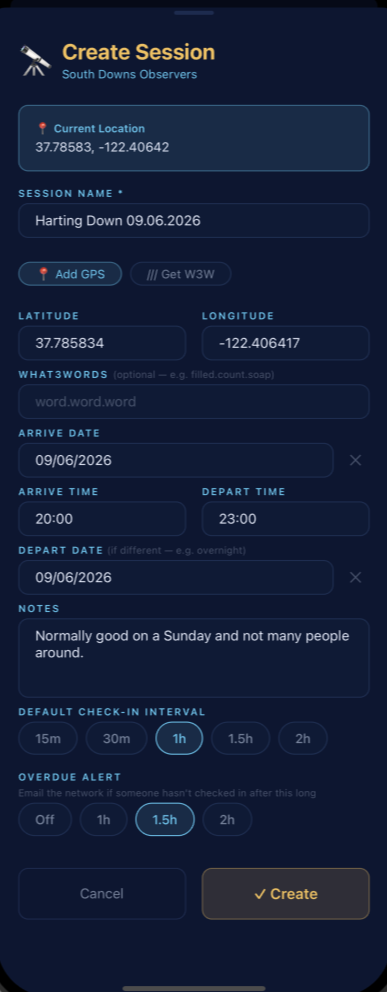
A session is a planned outing with a start time, end time, a check-in interval and optional overdue check-in interval. The app only lets you check in during an active session — so plan your session before you head out.
Starting or ending a session early
If your plans change, the owner of the session can start a session early (up to one hour before its scheduled time) by tapping ▶ Start Now on the upcoming session card on the dashboard. To finish early, tap ■ End Session Early on the active session card.
Saved sessions
Star a session to save it as a template. Tap a saved session and choose New from Template to create a new session pre-filled with the same location, notes and interval and optional overdue — with today's date and next available time filled in automatically.
↑ Back to top4. The Dashboard — Your Safety Hub
The Dashboard is the main screen you will use when you are out. It shows:
- Your current check-in status and countdown timer
- Your GPS location and what3words address
- The active session details and any session reports
- A live summary of your network's status
- The RAG check-in buttons
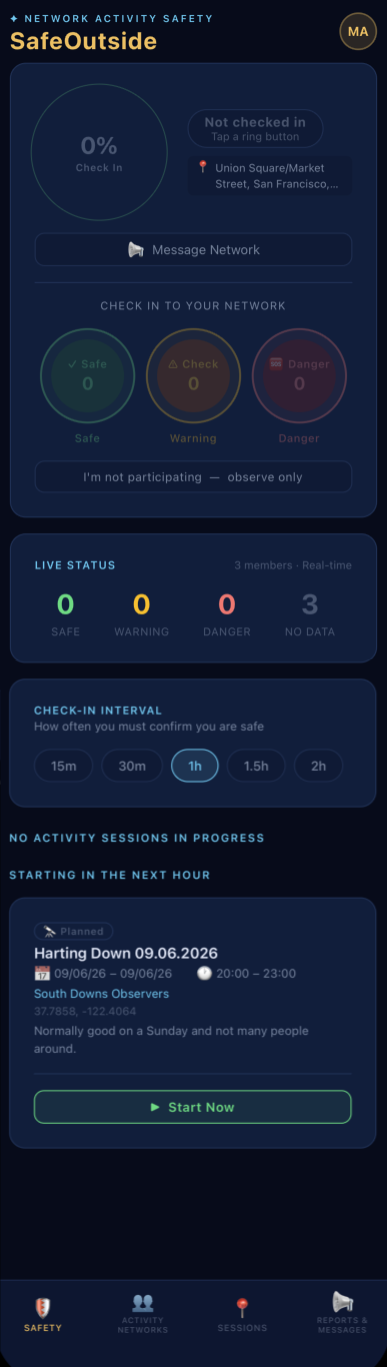
The dashboard also shows sessions starting within the next hour under "Starting in the Next Hour" so you can start early if needed.
Tap 📢 Message Network to quickly send a message or report to everyone in your network without leaving the dashboard.
↑ Back to top5. Checking In — the RAG Status System
During an active session, you check in by tapping one of the three coloured buttons. Your status is broadcast to your network in real time.
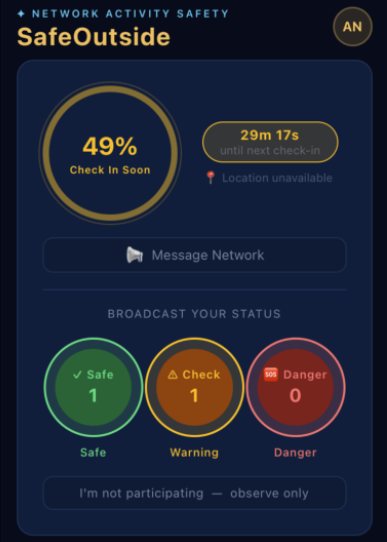
The countdown ring shows how much time is left until your next check-in is due. As the ring empties, your status on your network's screen will automatically escalate from green to amber to red — letting your network know you may need help.
If your timer expires without a check-in, your network is notified and a missed check-in is logged. As soon as you check in green or amber, the timer resets and your network is updated immediately.
Overdue check-in alerts
When planning a session you can switch on an overdue alert and choose how long is too long — for example one hour, 90 minutes, or two hours. If you go past that without checking in, SafeOutside emails everyone in the network so they know to make contact. It's an extra safety net on top of the live status escalation, and it's entirely optional — leave it off if you'd rather not.
Important: Always check in before your timer reaches zero. If you know you will be out of signal, check in green just before you lose connectivity so your network knows you are safe going in.
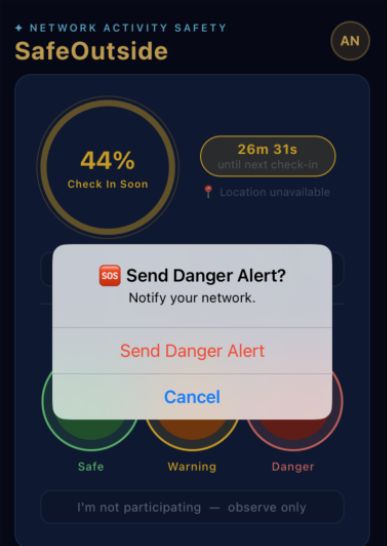
6. Sending an SOS Alert
Only press the red button if you are in genuine danger or require emergency assistance. It immediately alerts your entire network.
When you tap the red Danger button and confirm, SafeOutside instantly sends an alert to every member of your network containing:
- Your name and the time the alert was sent
- Your GPS coordinates and what3words address
- A link to your location on Google Maps
- Your session details (name, planned times, notes)
- Recent session reports
Alerts are sent by push notification, email, WhatsApp (if the network has a group link), and Discord (if a webhook is configured).
Remember: SafeOutside is not the emergency services. Always call 999 (UK) or 911 (US) first if you are in immediate danger. See our Disclaimer. The app is an aide — if you are worried, call someone directly.
7. Reports & Messages
Use the Reports & Messages tab (or the 📢 Message Network button on the dashboard) to post updates to your network during a session.
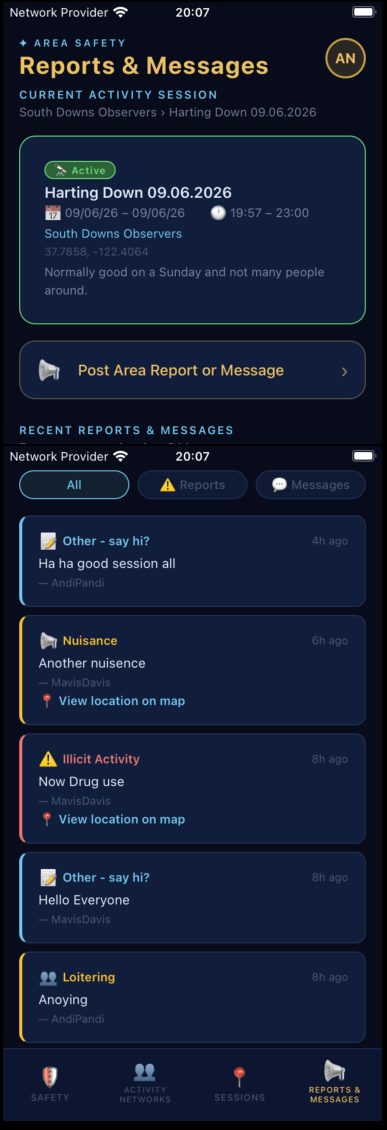
Reports are attached to the active session and remain visible for 24 hours. Filter between ⚠️ Reports and 💬 Messages using the tabs at the top of the list.
If your active session has unread reports or messages, an alert badge appears on the session card on your dashboard — tap it to jump straight to the filtered view.
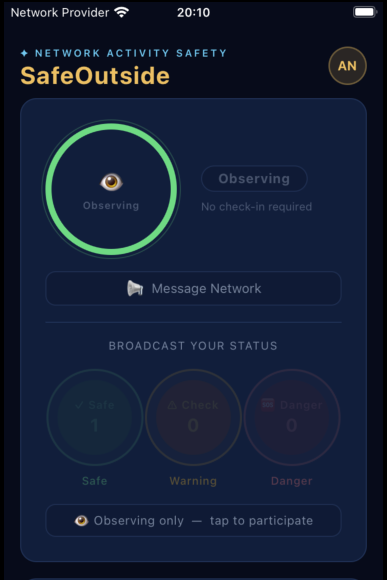
↑ Back to top8. Observer Mode
If you want to monitor your network without participating yourself — for example, you are the base camp coordinator, a remote support contact, or simply watching tonight's outing from home — enable Observer Mode.
Tap "I'm not participating — observe only" on the dashboard. In observer mode:
- You can see the full network status in real time
- You will not be prompted to check in
- You appear as "Observing" to other network members
- Your observer status is remembered per network
9. Challenges Pro
Challenges add a bit of purpose and fun to an outing — a shared checklist of things to spot, reach or achieve during a session. Think "find five Messier objects", "reach the summit", or "log three wildlife sightings".
The session card shows how many challenges are set and how many you've completed (e.g. 1 of 3 complete). Pro and Lifetime members can create, edit, favourite and delete their own challenges.
↑ Back to top10. Smartwatch Check-Ins Early access
For the quickest possible check-in, pair a Wear OS smartwatch with SafeOutside. Glance at your wrist, tap once, and you're checked in — no need to take your phone out.
The watch shows your current session, a live countdown ring, and the same RAG check-in buttons as the app. It's an early release — we'd love your feedback.
↑ Back to top11. what3words
what3words divides the world into 3 metre squares, each with a unique three-word address. SafeOutside uses what3words to give your check-in location a precise, human-readable address that is easy to communicate over the phone or radio.
When you create a session you have the option to go to the W3W website and get the unique address that lets users know where the session starts, currently all checkins record GPS signatures (longitude and latitude)
↑ Back to top12. Past Sessions & Archive
Once a session's end time has passed it moves to your Past Sessions archive — open it from the Account menu (or the Archive link in the web app). From there you can:
- Review old outings and their details
- Re-save a session you removed from your favourites by mistake
- Permanently delete a session you no longer need
Deleting a session removes all of its data — check-ins, reports, messages and challenge progress — but never affects your network or its members. You'll always be asked to confirm first, and deletions are kept recoverable for a short period in case you change your mind.
↑ Back to top13. Tips for Safe Use
- Plan your session before you leave — the app must have an active session to accept check-ins.
- Set a realistic check-in interval — shorter intervals give your network more confidence but require more attention from you. 30–60 minutes is a common choice.
- Check in before you lose signal — if you know you are heading into a dead zone, check in green just beforehand.
- Tell someone your plans — the app is not a substitute for letting a trusted person know where you are going and when you expect to be back.
- Keep your phone charged — carry a power bank on longer outings.
- Do not rely solely on the app — carry a PLB or satellite communicator for serious remote expeditions.
- If in doubt, call — if you are worried about someone, phone them directly. The app is an aide, not a replacement for direct contact. See our Disclaimer.
In an emergency always call 999 (UK) or 911 (US) first. SafeOutside does not connect you to emergency services. Please read our full Disclaimer before using the app.